Search This Blog

Jun 5, 2012

Add a New User to Local/Sample Database

Add a New User to Sample/Local Database
1.      Locate the dbisqlc.exe utility under the Siebel Thick Client Installation directory BIN folder.
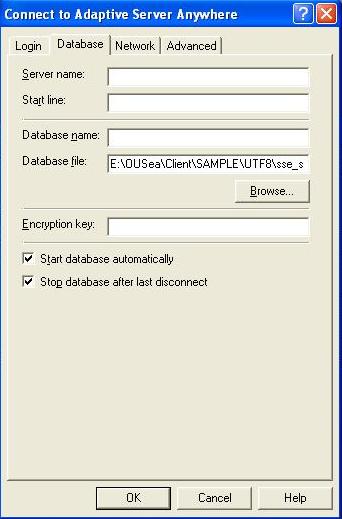
Browse the Path of Sample/Local Database file.
Login To Sample/Local Database .
Scrip to Execute:
Grant connect to DDEV identified by DDEV
Grant membership in group SSE_ROLE to DDEV

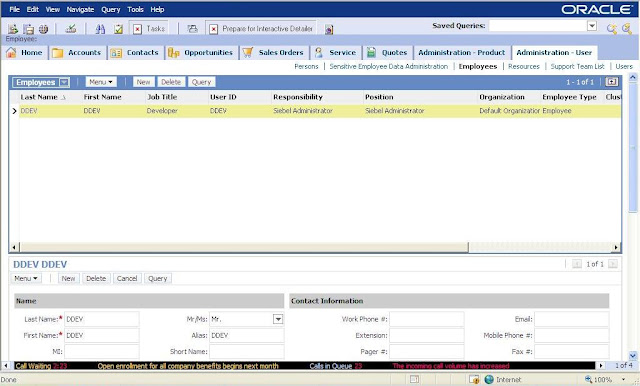
2.      Create the DDEV Employee in the Application.

 3. Now this user can access the Siebel Application and Tools Application. 

Jun 4, 2012

Siebel Server Silent Installation

Siebel Server Silent Installation


Today we are going to learn about how to install Siebel server in silent mode.
What all you need to have a Siebel setup ready with you.
Steps

1 - Open the Command prompt and change the location where your Siebel Enterprise Server setup is located.
2 - Launch the Siebel Enterprise Setup in a recorded mode. Entre the following command to store the configuration in .ini file.
3 - Follow the wizard to create a input parameters for Siebel server configuration.
4 - Now check the [E:\TEMP\silentSiebel.ini] file which has all the input arguments selected during the wizard. 
5 - Now this file will be used in the silent installation of Siebel Server. 
6 - Now run the Siebel Enterprise Server Configuration Setup by going to 
            Start – Programs – Siebel Enterprise Server Configuration 8.1 – Siebel Server Configuration  
7 - Configure Product for Offline Deployment Mode. [It creates an XML file at end]. 
8 - Pass the following Parameters during the wizard


Parameter name
Value To be Select or Type
Mode
Configure Product for Offline Deployment Mode
Action
Create New Configuration file
Database Config Info
Next
GNS Server Authentication User Account Name
SADMIN
GNS Server Authentication User Account Password
SADMIN
GNS Host name
Machine Name or IP Address
GNS TCP/IP Port
2320
Siebel Enterprise Name
OUEnt
Siebel Server Name
Machine Name [ Your Wish ]
Siebel Server Description
Describe the Server in words. [Optional]
Enable Component Groups
Call Center or As per your Wish
SC Broker Port
2322
Sync Manager Port
40401
Additional Task
None
Register Oracle ODBC
Not Selected
Clustering Configuration
Not Selected
Siebel Server Services Auto
Not Selected
Final Tasks
Next
Summary View
Next


9 - Save the file into E:\Temp\silent_server.xml
10 - Now edit your silentSiebel.ini file to invoke configuration file just you created. 
11 - Finally invoke the Silent installer by going back to command prompt.
12 - Enter the following command to invoke the installer to run in the console and take the input parameters from silentSiebel.ini file.
    Setup.exe –is:javaconsole  -console  -args  SS_SETUP_INI=E:\TEMP\silentSiebel.ini
13 - It will invoke certain other console windows.
14 - Open the Services window and confirm that your Siebel server services are created successfully. 
15 - Now login in the application through think client And now you are done.


May 2, 2012

Siebel Service Window Script - Simple


Following Script will start the windows service if the status is stopped.

================================================================

for /F "tokens=3 delims=: " %%H in ('sc query "Windows_Service Name" ^| findstr "        STATE"') do (
  if /I "%%H" NEQ "RUNNING" (
   REM Put your code you want to execute here
   REM For example, the following line
   net start "Windows_Service Name"
  )
)

Comments:

Please change the name of the service as per your services details.
Refer the Image here for Name of the Service : 


Feb 16, 2012

Configure Email Notification about Component Job Fail


Configure Email Notification about Component Job Fail
  • Navigate to Administration - Server Configuration > Enterprises > System Alerts.
  • Select Administrator Email Alerts and select Copy Record from the applet-level menu.
  • Enter the following details as shown in below image.
  • Set the Workflow Process Manager component to use this event notification profile. [Change the Parameter Value: to Profile You Just Created It. 
  •  Parma Name: Notification Handler

  •  Param Name: Notification Action on Task Ex     Value = 1


  • Now create a job for this component without any parameter to generate an error message.


  •  See the Result in Outlook express.
  •  

How to create a Constraint PickList?


Today, I am going to share a very basic, and I would say a, "unique feature" in Siebel by which we can restrict values being displayed inside the PickList.

Here you go, "lets assume I need to create two fields a) Country b) State, on Opportunity business Component, along with their respective pick-lists, in such a way that system will display the list of States in the drop-down which belongs to the 'Country' selected in the Country Field."

Here below are the steps need to follow:

1. Check for the available columns (Characters Length: 30) in S_OPTY table, which is not being used by any of the field in Opportunity Business Component. Lets assume two fields for the purpose are ATTRIB_01, ATTRIB_02.

2. Create two PickLists for Country & State fields.
a) For Country
PickList Name: Country PickList
Project: Oppty
Bounded : TRUE
Business Component : PickList Generic
Static : TRUE
Type Field : Type
Type Value : COUNTRY_LIST

b) For State
PickList Name : State PickList
Project : Oppty
Bounded : TRUE
Business Component : PickList Generic
Static : TRUE
Type Field : Type
Type Value : STATE_LIST

3. Create LOV values in "Administration - Data -> List of Values" view, with the following values (I am assuming you know how to create LOV values)
a) For Country : (Type = COUNTRY_LIST)
Values = US, India
b) For State : (Type = STATE_LIST)
Values = Georgia, Ohio, Texas, NewYork, NewJersey (Put Description = US, for all)
Values = Uttar Pradesh, Madhya Pradesh, Karnatka, Gujrat (Put Description = India, for all)

4. Create two fields on Opportunity Business Component.
a) For Country
Name : Country
Column : ATTRIB_01
PickList : Country PickList

Country's Field PickMap
1. Field: Country
PickList Field: Value
Constrain: FALSE
b) State
Name : State
Column : ATTRIB_02
PickList : State PickList

State's Field PickMap
1. Field: State
PickList Field: Value
Constrain: FALSE

2. Field : Country
PickList Field : Description
Constrain: TRUE
5. Create two fields on Opportunity List Applet :
a) For Country
Name : Country
Field : Country
Display Name - StringOverride : Country
Runtime : TRUE

b) For State
Name : State
Field : State
Display Name - StringOverride : State
Runtime : TRUE

6. Expose the two fields created on the Edit List webapplet layout of the Opportunity List Applet.

7. Compile the SRF with all the configuration done so far and see the magic on the UI.


Siebel Diagnostic Data Collector

1 – Collect the Gateway Server Details with the following Command.
             Note: Ensure that you gateway server is up and running state.
 A.     Open the command prompt and change the working directory.
 %Siebel Installation Dir% Gateway Server Dir / Bin Folder
              B.     Type the following command to run SDDC.
Siebsnap.exe     –g     –u SADMIN     –p SADMIN
                  -g  :   Stand for Gateway Server
                  -u  :    Stand for User ID
                  -p  :    Stand for User Password
Note:  This command will generate the following directory with all the details:  Refer the Image here.


 2 – Collect the Siebel Server Details with the following Command.
            Note: Ensure that you siebel server is up and running state.
C.     Open the command prompt and change the working directory.
%Siebel Installation Dir% Gateway Server Dir / Bin Folder
            D.     Type the following command to run SDDC.
Siebsnap.exe     –s     –u SADMIN     –p SADMIN
                  -g  :   Stand for Siebel Server
                  -u  :    Stand for User ID
                  -p  :    Stand for User Password
 Note:  This command will generate the following directory with all the details: Refer the Image here.

 3 – Collect the Siebel Web Server Extension Details with the following Command.
            Note: Ensure that you web server is up and running state.
E.      Open the command prompt and change the working directory.
%Siebel Installation Dir% Gateway Server Dir / Bin Folder
            F.      Type the following command to run SDDC.
Siebsnap.exe     –w
                  -g  :   Stand for Siebel Web Server Extension

Note:  This command will generate the following directory with all the details:  Refer the Image here.


Feb 13, 2012

Error While Generating a New Database


Error While Generating a New Database

SBL-GDB-00004: Error in Main function.

Error Details:
Executing  “Generate New Database” Job resulted in following error.
SBL-GDB-00004: Error in Main function


Reason:
We increased the log level for Generate New Database Component and analyzed the generated logs. In logs we found the following information

Trace TracingInfo 3 0 2009-04-28 02:37:54 Copying template /siebdir/sieb78/siebsrvr/dbtempl/sse_utf8.dbf
to /siebdir/sieb78/siebsrvr/dbtempl/db42r53.682/sse_utf8.dbf...
GenericLog GenericError 1 0 2009-04-28 02:37:54 Error creating SQL Anywhere database template file (UTLFileCopy szTemplFileName -> szWatcFileName).


Solution:

Further analysis revealed that sse_utf8.dbf file was not present in  /siebsrvr/dbtempl. After going through bookshelf and metalink we came to conclusion that there are two files that should be present in /siebsrvr/dbtempl/ folder

    sse_utf8.dbf
    sse_encr.dbf

We copied these files from other server and exectued “Generate New Database” Job and it ran successfully.

Siebel IP 2017 - Web Tool Development Steps

Siebel IP 2017 Development and Deployment Steps : 1. Click on the Workspace Icon in Siebel Web Tools application. 2. Create a New work s...