Search This Blog

Jun 5, 2012

Add a New User to Local/Sample Database

Add a New User to Sample/Local Database
1.      Locate the dbisqlc.exe utility under the Siebel Thick Client Installation directory BIN folder.
Browse the Path of Sample/Local Database file.
Login To Sample/Local Database .
Scrip to Execute:
Grant connect to DDEV identified by DDEV
Grant membership in group SSE_ROLE to DDEV

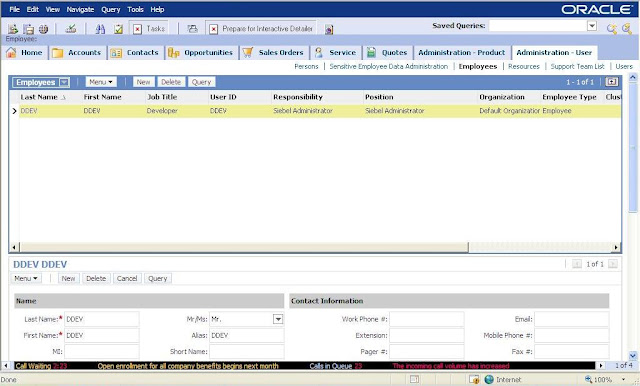
2.      Create the DDEV Employee in the Application.

 3. Now this user can access the Siebel Application and Tools Application. 

Jun 4, 2012

Siebel Server Silent Installation

Siebel Server Silent Installation


Today we are going to learn about how to install Siebel server in silent mode.
What all you need to have a Siebel setup ready with you.
Steps

1 - Open the Command prompt and change the location where your Siebel Enterprise Server setup is located.
2 - Launch the Siebel Enterprise Setup in a recorded mode. Entre the following command to store the configuration in .ini file.
3 - Follow the wizard to create a input parameters for Siebel server configuration.
4 - Now check the [E:\TEMP\silentSiebel.ini] file which has all the input arguments selected during the wizard. 
5 - Now this file will be used in the silent installation of Siebel Server. 
6 - Now run the Siebel Enterprise Server Configuration Setup by going to 
            Start – Programs – Siebel Enterprise Server Configuration 8.1 – Siebel Server Configuration  
7 - Configure Product for Offline Deployment Mode. [It creates an XML file at end]. 
8 - Pass the following Parameters during the wizard


Parameter name
Value To be Select or Type
Mode
Configure Product for Offline Deployment Mode
Action
Create New Configuration file
Database Config Info
Next
GNS Server Authentication User Account Name
SADMIN
GNS Server Authentication User Account Password
SADMIN
GNS Host name
Machine Name or IP Address
GNS TCP/IP Port
2320
Siebel Enterprise Name
OUEnt
Siebel Server Name
Machine Name [ Your Wish ]
Siebel Server Description
Describe the Server in words. [Optional]
Enable Component Groups
Call Center or As per your Wish
SC Broker Port
2322
Sync Manager Port
40401
Additional Task
None
Register Oracle ODBC
Not Selected
Clustering Configuration
Not Selected
Siebel Server Services Auto
Not Selected
Final Tasks
Next
Summary View
Next


9 - Save the file into E:\Temp\silent_server.xml
10 - Now edit your silentSiebel.ini file to invoke configuration file just you created. 
11 - Finally invoke the Silent installer by going back to command prompt.
12 - Enter the following command to invoke the installer to run in the console and take the input parameters from silentSiebel.ini file.
    Setup.exe –is:javaconsole  -console  -args  SS_SETUP_INI=E:\TEMP\silentSiebel.ini
13 - It will invoke certain other console windows.
14 - Open the Services window and confirm that your Siebel server services are created successfully. 
15 - Now login in the application through think client And now you are done.


Siebel IP 2017 - Web Tool Development Steps

Siebel IP 2017 Development and Deployment Steps : 1. Click on the Workspace Icon in Siebel Web Tools application. 2. Create a New work s...